Showing posts with label Recipes. Show all posts

Monday, 2 December 2013

An Advent Calendar for Karen

Hello audience, a lot of you have been sent here by the lovely Tamara from Confessions from a part-time working mom, and others have probably stumbled here by accident while trying to find whatever high brow stuff normal people look at while browsing the internet. (I personally prefer sites that feature toilet humor, but that definitely doesn't happen around here.)

There is nothing funny to be seen here at all.

But for those of you who know exactly why you're here (and even for the ones who don't) I was contacted by Tamara in mid November when she invited me and a heap of other bloggers to help her create an advent calendar for the lovely and ever so talented Karen from Baking in a Tornado. You see Karen never had the pleasure of owning an advent calendar as a child. Can you imagine not knowing the excitement that is that cardboard box with little windows full of tiny chocolates? When I was a kid that was the only way I knew how close we were to the big day. But being one of six kids we never actually got to eat much chocolate, it was one of the only times I wished my mum had stopped at two kids. (OK that's a lie, I always wished my mum had stopped at two.)

One pile each, that might have been almost enough to make me happy...

So today is my turn to make the chocolate to go behind the little window (and as with everything else I do, it must come with a long winded speech). I have wracked my brains for a whole ten minutes now, trying to come up with something that is special enough to give to one of the loveliest bloggers I know. I've decided since Karen is such a food lover, I'd give her a recipe straight out of a real Aussie Christmas. Now I don't use this recipe, as we are lazy chefs at my house and buy our meringue base pre-baked from Woolworths, but I have gotten it from the oldest recipe book in our house, The Australian Women's Weekly Cookbook, published in 1977, so you know this recipe is the real deal. For a real Australian taste at your next Christmas dinner, whip up this little beauty and impress your family and friends.

Pavlova

Ingredients
3 egg whites at room temperature (little tip, make sure the eggs are a few days old for really stiff peaks)
a pinch of salt
3/4 cup of castor sugar
1/4 cup of white sugar
1 tablespoon of cornflour
1 teaspoon lemon juice
500ml thickened cream (17 fluid ounces I think)
Fresh fruit to top (or if you're my family, peppermint chocolate and Cadbury Flake)

Pre-heat the oven to 90 degrees celsius if it is a gas oven or 160 degrees celsius if it is an electric oven (200 and 325 degrees farenheit)
Beat the egg whites and salt until they form stiff peaks
Add the caster sugar gradually, beating well between each addition
Combine the white sugar and cornflour and lightly fold into the meringue with the lemon juice
Spoon the mixture into a round cake dish and bake in the oven for 1 hour if it is a gas oven or 30 - 40 minutes if it is an electric oven
When the pavlova base is dry to the touch turn the oven off and leave the pavlova inside the oven to cool
When the pavlova is cool whip the cream and spread over the entire pavlova base
Decorate the top of the pavlova with soft fruit such as berries, kiwi fruit, bananas and/or chocolate.
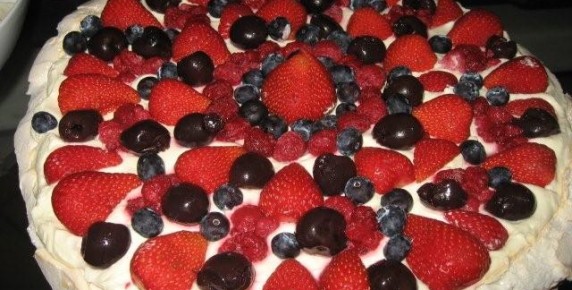

Well now that I have revealed one of the things we have on our table every single Christmas, I hope you can all enjoy it too.  A big thank you to Tamara for setting this all up, and Merry Christmas Karen, two days down, twenty two days to go. Enjoy the rest of your calendar.


Monday, 6 May 2013

Recipe - Potato, Chicken and Leek pie

Hello again and welcome to another recipe Monday. For all of my Aussie friends, sorry that I didn't get this posted in time for your dinner tonight, but there is always tomorrow night. And given that it will be Tuesday, maybe you'll be in more of a mood to cook. I never feel like cooking on Mondays, sadly my local pizza store has also chosen Monday to be the one day out of the week that they don't open, leaving me absolutely no choice but to throw something together so that Miss K doesn't stare at me like a starving lion.

Now the recipe that I am about to share with you is definitely not something that I'd cook on a Monday, it's more like a Friday or a Saturday recipe. I need a lot of energy in me before I tackle anything as challenging as a pie. (For anyone who isn't completely impotent in the kitchen, you can do this every single day, I just have special needs as a cook.)

Ok so to make a potato, chicken and leek pie, you will need several things first.

2 sheets Shortcrust pastry for the base (or 2 sheets puff pastry if you prefer puff pastry and are happy blind baking it, I have given instructions for both methods.)
1 sheet Puff pastry for the top
500g chicken breasts diced
1 leek sliced
3 - 4 medium sized potatoes diced
1 and a half cup roughly chopped mushrooms
2 tablespoons of plain flour
1 cup chicken stock
1 cup cream
Salt and pepper to season
Milk or egg for the pastry crust

Serves 4

To make your pie:

Pre heat your oven to 200 degrees celsius (390 degrees farenheit) or 180 degrees celsius (350 degrees farenheit) if you have a fan forced oven.

If you are going to blind bake your bottom layer of puff pastry, do it now. It is fairly simple, just grease your pie dish and lay down your puff pastry sheets so that the entire tin is covered, including a lip at the top. Trim off any excess pastry. Pierce the pastry in several places to prevent it puffing up while it cooks. Place a sheet of greased baking paper or tin foil over the pastry (greased side down) then cover the top of the paper/foil with a layer of pie weights, or a generous amount of rice, making sure that the coverage is heavy enough to keep the pastry flat. Bake in your pre heated oven for 15 minutes, then remove the pie weights/rice and paper/foil covering and bake for a further 10 minutes until golden brown. If you haven't placed enough pie weights or rice on your pastry and it has puffed up, just press it down lightly before returning it to the oven. 

In a fry pan pre heat some oil, then cook the chicken for 5 minutes until it is lightly browned.
Add the leeks, potatoes and mushrooms, and cook for another 5 - 7 minutes until the leeks are softened.
Mix the plain flour into a small amount of water, to make it easier to combine with the other ingredients, then pour the liquid into the fry pan. Cook for another minute stirring.
Add the chicken stock and cream and bring the mixture to the boil.

If you are using shortcrust pastry, grease your pie dish now and line it with a layer of short crust pastry, ensuring that it has a lip. Trim off any excess pastry.

Spoon the mixture into the prepared pie dish, and brush the edge of the pastry with milk or egg.
Place the top sheet of puff pastry and press the edges down with a fork or your fingers.
Cut a small slit into the top of the pastry, then brush the top with egg or milk to give it a nice shine. Remember that the heat from the mixture inside will make the pastry quite soft and fragile, so you need to be gentle when brushing liquid on top so that you don't tear it.
Bake for 25 - 30 minutes until the pastry is golden brown.


Now that right there is one slice of pure delicious. Sadly it didn't last long in our house, but I always take that as a huge compliment.

And now it's your turn. Go and make this pie and impress your friends and family with the ancient art of pie-making which is really being lost in this day and age, especially with the freezer section of every supermarket full of row after row of machine made pies. 

Well I'll be back again tomorrow with another life hack, but until then, stay awesome.

Monday, 22 April 2013

Recipe- Toasted Banana and Nutella Sanga

Hello again my wonderful audience, I am back with another super dooper awesome recipe for you guys to share. Now I am feeling incredibly lazy today, which explains why I am so late in posting this recipe, as well as why I have chosen a simple meal to share with you guys today too.

So as you can tell from today's recipe, I'm showing you guys how to make a toasted sanga. For any of my audience who doesn't call Australia home, this term may confuse you, so to confuse you guys even further, I'll tell you that I'm either toasting sandwiches, or an Abyssinian Ox. I'll let you guys decide while I post this picture.

For anyone who guessed I was cooking an Ox, you are awesome, PM me now, we need to talk!

Yep I am so lazy that today my recipe is a toasted sandwich. But this is a toasted sandwich that takes a certain amount of skill. Because it's one thing to smear some Nutella on a piece of toast and walk to the lounge room while chewing on it. It's another to combine the Nutella with hot melty banana and eat it without ending up looking like a two year old who is still learning to eat properly.

This is usually how I look after eating one of these bad boys.

Ok so to make my favourite breakfast/lunch/snack/comfort food, you will need the following.

2 slices of bread. 
Margarine or butter to lubricate the bread
Nutella or other similar choc-hazelnut spread
1 medium to large banana
1 Sandwich press or grill

So to make a toasted banana and nutella sandwich, first spread your butter/margarine/olive oil spread/Nuttelex on both slices of bread
Smear a generous amount (read; shitload) of Nutella on one slice of bread
Mash the banana and spread it on the other slice of bread
Slap those two babies together, being careful not to spill any banana, that stuff is precious.
Put the sandwich in the sandwich press, or under the grill until the bread is golden brown and crispy, and the banana is nice and warm and soft

This bad boy feeds one, but don't be surprised if you start getting hungry eyes from everyone within a ten metre radius.


I'm so hungry I'm going to stab this melon....ladies

Well that's all from me for now, I'm off to go do something productive, like make another toasted banana and nutella sandwich. Later y'all.

Monday, 15 April 2013

Recipe - Tuna Pasta Bake

Hello again and welcome to another recipe Monday. Today I have another firm favourite meal from my family vault to share with you. This is another one I can usually guarantee that Miss K won't turn her nose up at, but I haven't made the mistake of serving it every week yet for fear that she'll get tired of it and start refusing to eat it like she did with the Dim Sims. So sit back and grab a pencil and pad while I teach you how to make a Tuna Pasta Bake.

Again apologies for the terrible photo, if any of you would like to donate a DSLR camera to a good cause I'm happy to give you my mailing address...

You'll notice that this meal isn't nearly as caramelised as the taco lasagna that I showed you last week, that is because this one is a lot quicker to cook, so you don't need tin foil on the tray to protect the cheese from becoming a fossil. So despite the terrible photography, I don't need to rely on Martha Stewart to make my meal look good this week. Success!!!

Alright before I send you off to the kitchen to cook this, I will send you to the supermarket with a shopping list that looks like this.

2 cups Penne pasta
1 400g tuna in springwater
1 tin tomatoes 
2 cups grated cheese
1 - 2 cups chopped mushrooms
1 sachet of chicken chasseur flavouring (or similar tomato based flavour packet)
salt and pepper to season

So you've gone up the street, you've bought your ingredients and they're sitting on the bench staring at you. Now what? well be patient and keep reading and prepare to be amazed.

First pre-heat your oven to 180 degrees Celsius. (That's approximately 356 degrees Fahrenheit for any of my American friends.)
Boil your pasta according to the instructions on the packet. 
While the pasta is boiling, combine the tinned tomatoes, the sachet of flavouring and half a cup of water in a saucepan. 
Bring the tomato mixture to the boil then remove from the heat.
Add the tuna and mushrooms (and any other vegetables you feel like sneaking in there) to the tomato mix and stir well. Season the mixture with salt and pepper as desired
Once the pasta is boiled, drain out the water, then combine the tomato mix and the pasta and stir well.
Transfer the mixture to an ovenproof dish and sprinkle the grated cheese on top. If you want to you can sprinkle cheese into the mixture as you are spooning it into the dish as well, just to make sure the cheesyness spreads throughout the whole dish.
Bake in the oven for approximately 20 minutes, until the cheese is golden brown.

And there you have it. A meal for 4 - 6 people, depending on how big you like to slice things. This is one of my all time favourite meals, and I hope you guys can enjoy it too. 

Well that's all from me today, except to let you guys know that the lovely Jamie from Being Positive with a Depressive Soul has accepted her Liebster Award today on her blog, so you can go check it out now. The lucky duck got two nominations this week so there is twice as much fun to see.

Tuesday, 9 April 2013

Recipe - Taco Lasagna

Hello again my wonderful readers, I mentioned in an earlier post here that I was going to share a recipe with you guys for taco lasagna. I am actually hoping to make recipes more of a regular thing around here, possibly sharing one of my recipes a week with you guys.

The thing with food around my house is it isn't fancy. The meals we eat around here are usually quick and easy and cheap. Given I have a fairly fussy and demanding two year old on my tail for most of the day, I don't have a lot of time to spend in the kitchen. So the recipes I will be sharing here will be pretty basic, but they are tasty, and for the most part they pass the taste test of the toughest food critic I have ever met too. Today's post is basically just to test the waters as it was, so I'm not pulling out the big guns just yet, I'll save the fancy meals and the decent photography for future posts.

So todays recipe is pretty outside the box. I've only actually cooked this meal once, and I buggered it up too, so you guys have the added bonus of learning a few do not's in the process here. I'll start with the photo first, and hopefully that will explain the big mistake for me.

Photo courtesy of the incredibly low resolution camera on my phone.

Now in my house, we call this process caramelisation, because burnt is just such a horrible word. I have a theory that if you put a terrible meal in front of a well known cook, it automatically makes it look better, so here is Martha Stewart holding my lasagna.

I'm guessing she's used to caramelised meals after her time in prison.

So to make a taco lasagna, you will need a few things.

1 pack of lasagna sheets (I use dried sheets because they are cheaper)
500g minced beef (I think Americans call it ground beef?)
2 jars tomato salsa
1 sachet of taco meat seasoning
1 onion
1 - 2 carrots
1 - 2 zucchinis
2 - 3 cups sliced mushrooms
Grated cheese (as much as you want)
Aluminium foil (this is absolutely vital if you want to avoid caramelising your own lasagna)
A deep sided oven proof dish

Pre-heat the oven according to the instructions on the lasagna sheets. 
Finely chop up your onion, and fry it in a pan until it is brown and soft. 
Add the minced beef and the taco seasoning to the fry pan, as well as however much water the taco seasoning sachet tells you to add. 
Cook until the meat is browned.
While the meat is cooking slice your vegetables thinly
Once the meat is cooked properly, take it off the heat. In your oven proof dish start layering the ingredients, starting with sheets of lasagna. You can really do it in any order that you desire, but I usually go pasta, meat, cheese, salsa, vegetables, pasta etc...
Once your layers go to the top of the dish (or until you run out of ingredients) sprinkle the top with a generous layer of cheese
Cover your entire dish with a sheet of foil, and bake according to the instructions on your lasagna sheets. To brown the cheese, take the foil off for the last ten minutes.

And that is it. One taco lasagna ready to serve. Hopefully without the black layer on top that needs to be removed with a jackhammer. If any of you are brave enough to try this recipe, please feel free to let me know how your meal pans out. If you can think of ways to improve it, I'd love to hear them too. 

Oh and I know that technically this isn't a real lasagna, and if Miss K's nonna ever sees this post we will probably be disowned from the family for crimes against Italian food, but I seriously don't have an hour to waste making bechamel sauces and tomato sauces and rolling my own pasta like she does, so I'm sticking with my hacked version.

So from me and Martha Stewart it is good night, and I'll see you guys again soon.


Related Posts Plugin for WordPress, Blogger...